Updated September 5, 2026
Disclosure: As an Amazon Associate, I earn from qualifying purchases. This comes at no extra cost to you and helps keep this site running.
If Autopilot has started throwing “camera blocked or blinded” warnings, or you can see a hazy film on the glass when the sun hits the windshield just right, it's time to clean Tesla windshield cameras from the inside. More precisely, the windshield in front of the cameras. Interior plastics slowly off-gas and leave a fine film on the inside of the glass, and the section directly in front of the forward cameras sits behind a plastic cover where normal windshield cleaning can't reach it.
The good news: on my Model Y, getting to that glass took two plastic covers, one small cover on the mirror neck, and a quarter-turn of the mirror. No special tools and about 15 minutes round trip. Here's exactly how to do it, with photos from my own car.
One scope note before we start: this guide is about cleaning the camera area, meaning the glass and housing around the cameras. The camera lenses themselves rarely need attention, and when they do, a single gentle pass with a lens wipe is all you want to do there (more on that below).
What You Need to Clean Tesla Windshield Cameras
Three inexpensive items, all of which you'll reuse all over the car. I like Invisible Glass because it cleans well and leaves no streaks or residue — and it's ammonia-free and tint-safe, which matters this close to camera optics and tinted glass.
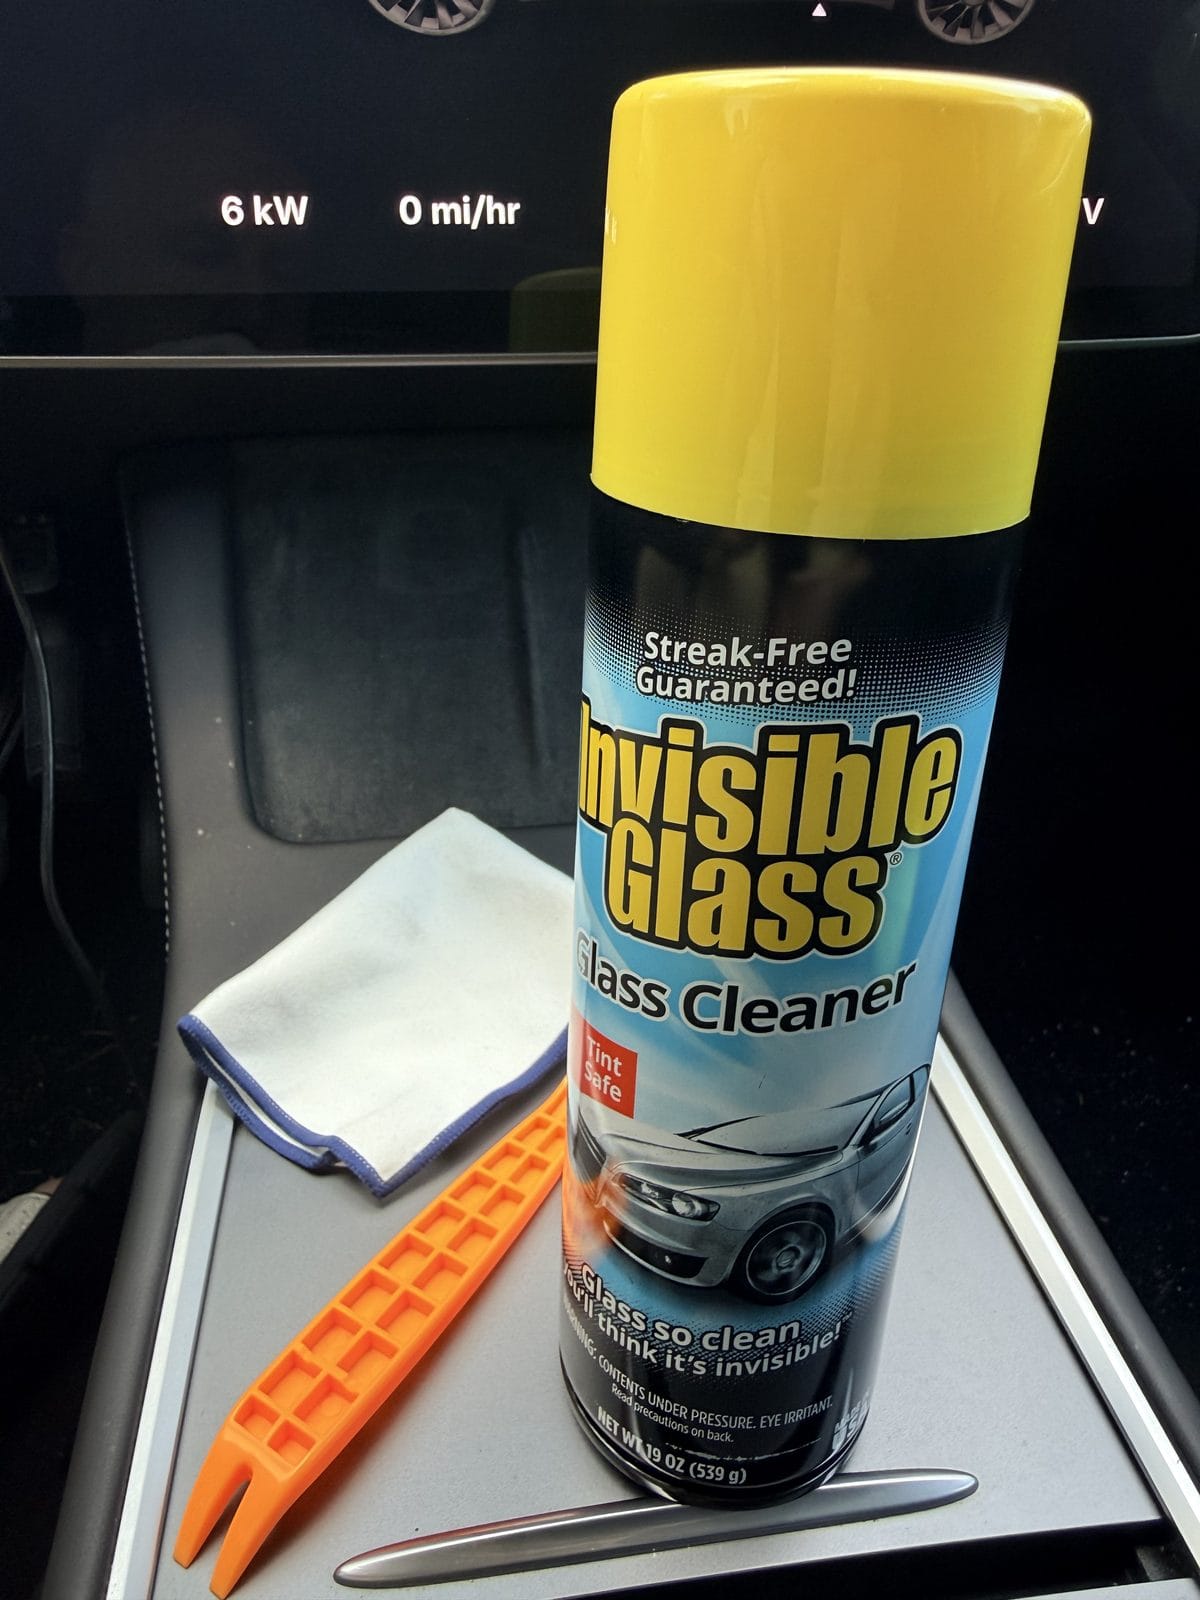
Invisible Glass 19 oz Aerosol Glass Cleaner (2-Pack)
My go-to glass cleaner — it cleans well and leaves no streaks or residue, which is exactly what you want on the glass your cameras look through. The aerosol foam clings instead of dripping down into the electronics area, and it's ammonia-free and tint-safe. One can lasts a long time; the two-pack keeps a spare in the garage.
Specs: 19 oz aerosol | Ammonia-free | Tint-safe | Streak-free formula
Check Price on Amazon →GOOACC 5-Piece Auto Trim Removal Tool Kit
The orange pry tool in my photos. Nylon trim tools flex just enough to pop clips without scratching or gouging the plastic covers the way a screwdriver would. This five-piece kit covers every shape you'll need for this job and every other interior job after it — at this price it's a permanent glovebox resident.
Specs: 5 pieces | Impact-resistant nylon | No-scratch on painted and interior surfaces
Check Price on Amazon →The Rag Company Waffle-Weave Glass Towels (3-Pack, 16″×16″)
A glass-specific waffle-weave towel matters more than the cleaner. Regular microfiber leaves fine lint on glass; waffle-weave doesn't — and the dry pass with one of these after cleaning is what actually removes the haze in front of the cameras. Any lint-free glass cloth works; these are the ones that have held up for me across dozens of washes.
Specs: 370 GSM waffle-weave microfiber | Lint-free, streak-free | 16″ × 16″
Check Price on Amazon →How to Clean the Camera Area, Step by Step
These photos are from my Model Y. The covers and clips are nearly identical across Model 3 and Model Y; the one step that genuinely differs by model and year is how the mirror comes off — there's a chart for that in the next section. Park the car, and give yourself working room before you start.
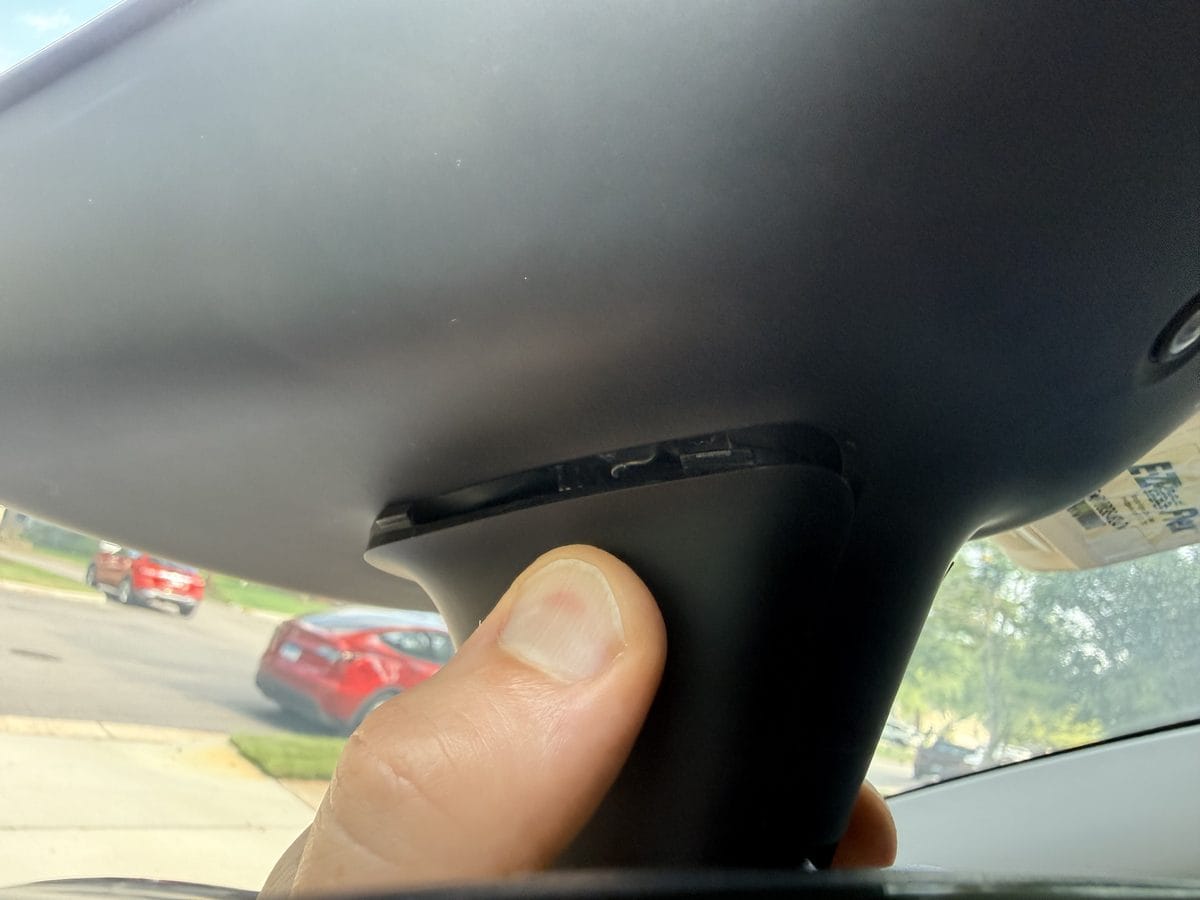
Step 1: Remove the mirror-neck cover
Start with the small cover where the mirror stem meets the headliner. Squeeze the sides to release the tension clips and pull downward to remove it. There may be a thin plastic retainer cord inside — you can easily unhook it from its holder. Set the cover aside.
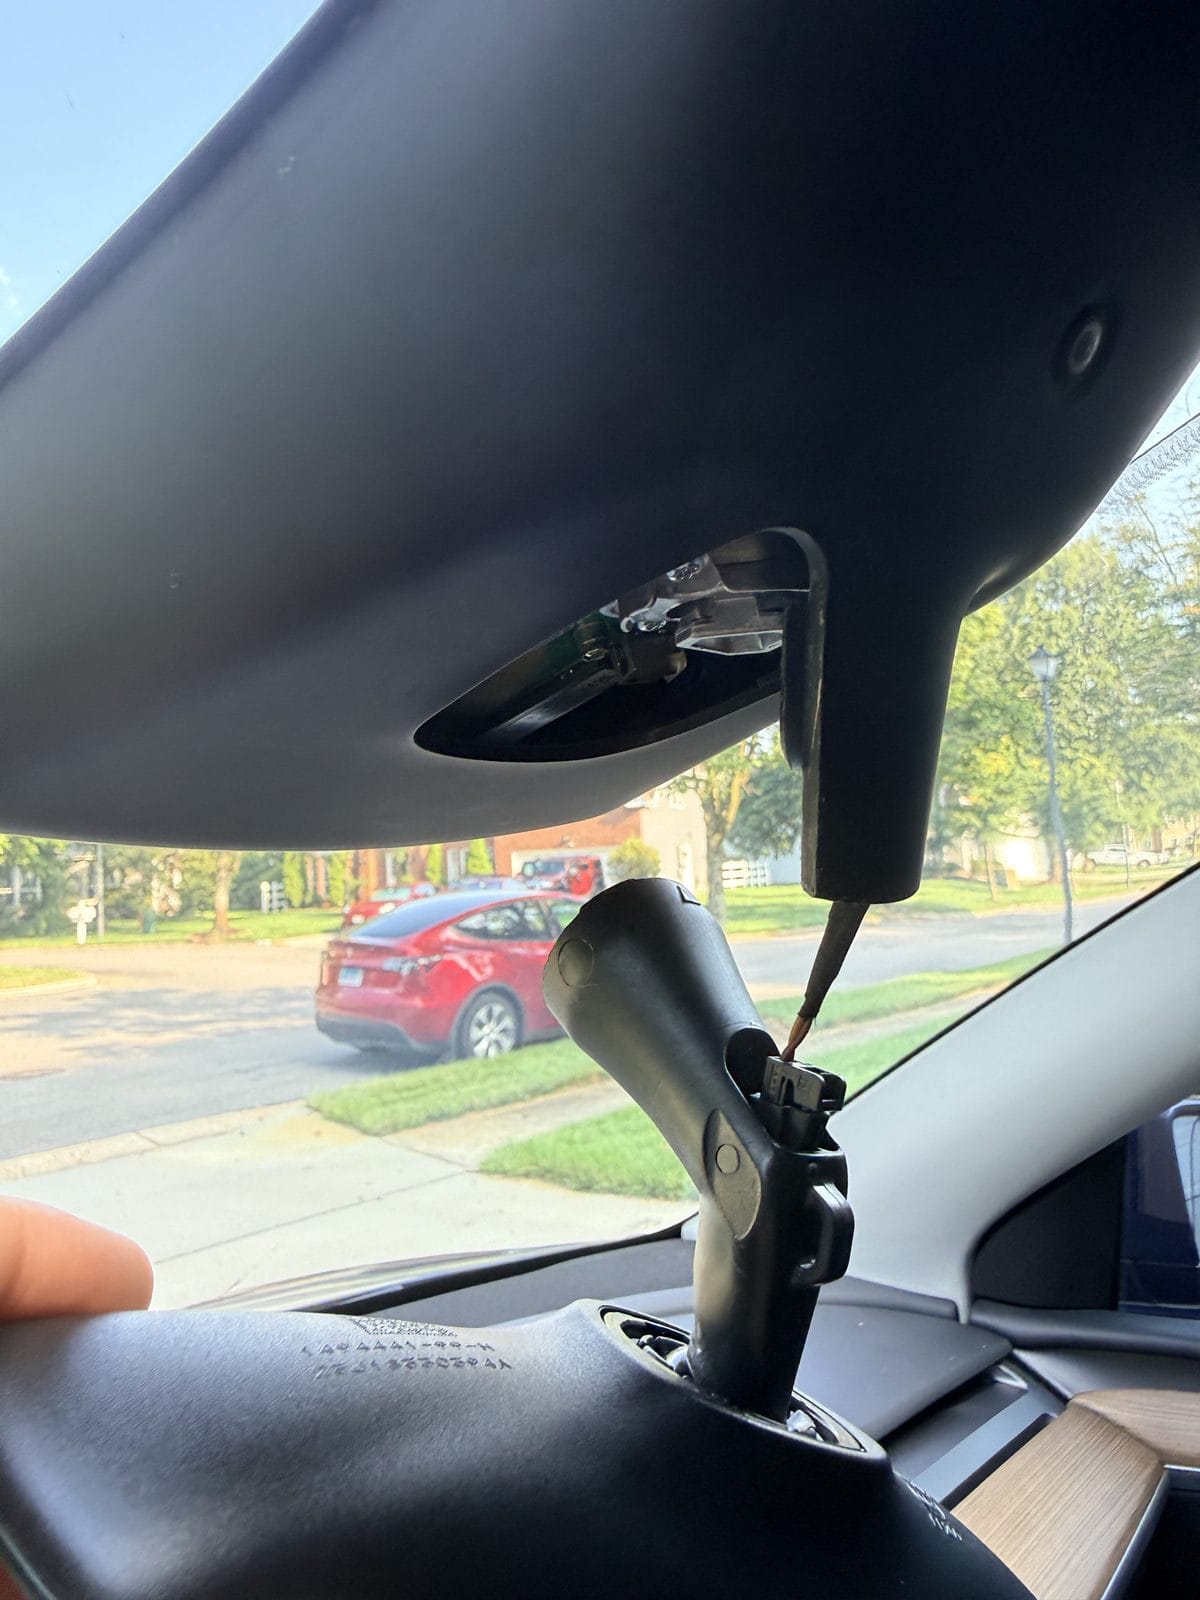
Step 2: Remove the rearview mirror
On my Model Y, you remove the mirror by firmly grasping the base behind the mirror and twisting a quarter turn counterclockwise. Grip the base/stalk, not the mirror glass itself. Auto-dim mirrors have a wiring harness attached, so don't yank it free — support it and let it down gently.
Step 3: Pop off the large outer cover
Use the trim tool to get behind the edge of the big plastic cover and pop it off its clips. Placing a couple of fingers in the hole where the mirror was gives you leverage to help pull it away.
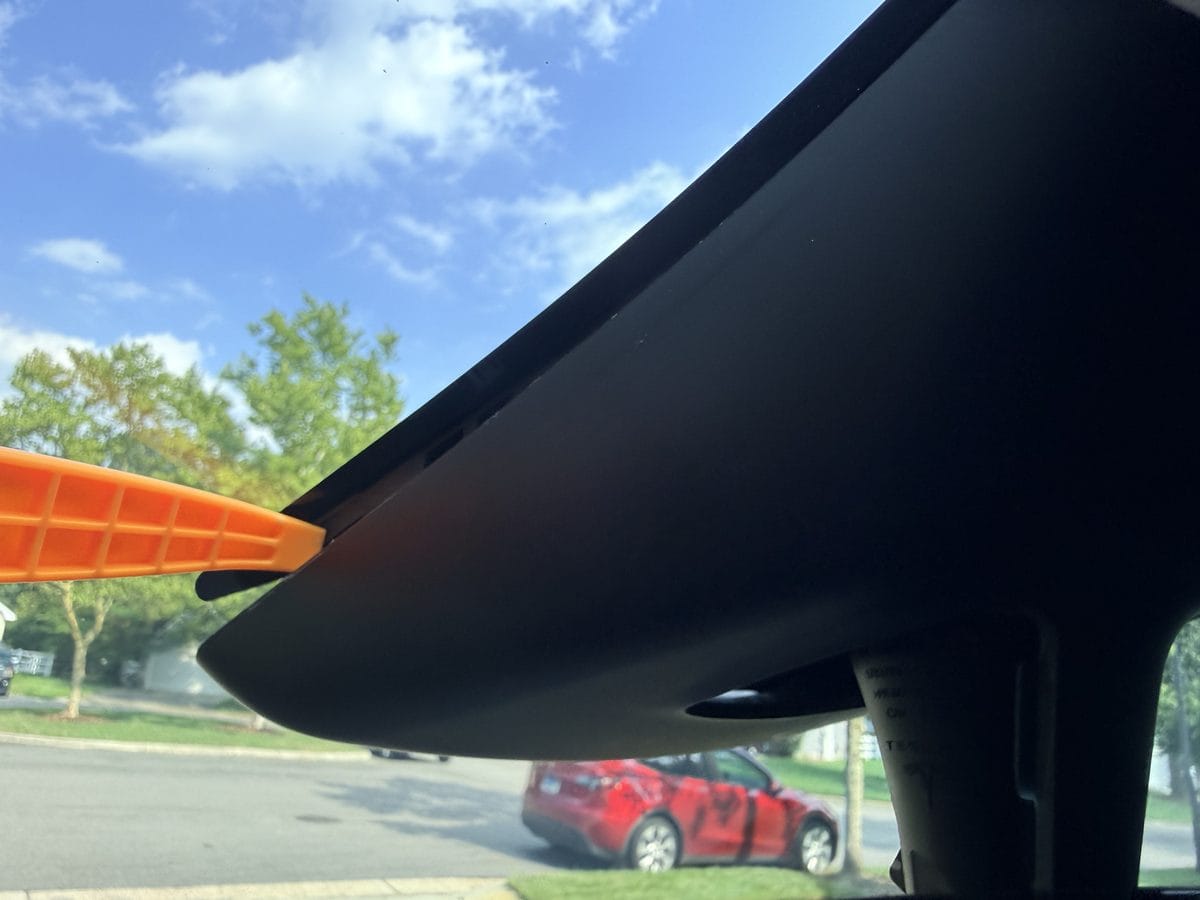
Step 4: Release the inner camera cover
There's one more cover directly over the cameras. It releases with a small clip on each side — in the photo below, the orange tool is pointing to the clip on the left side. Release both clips and lift the cover away.
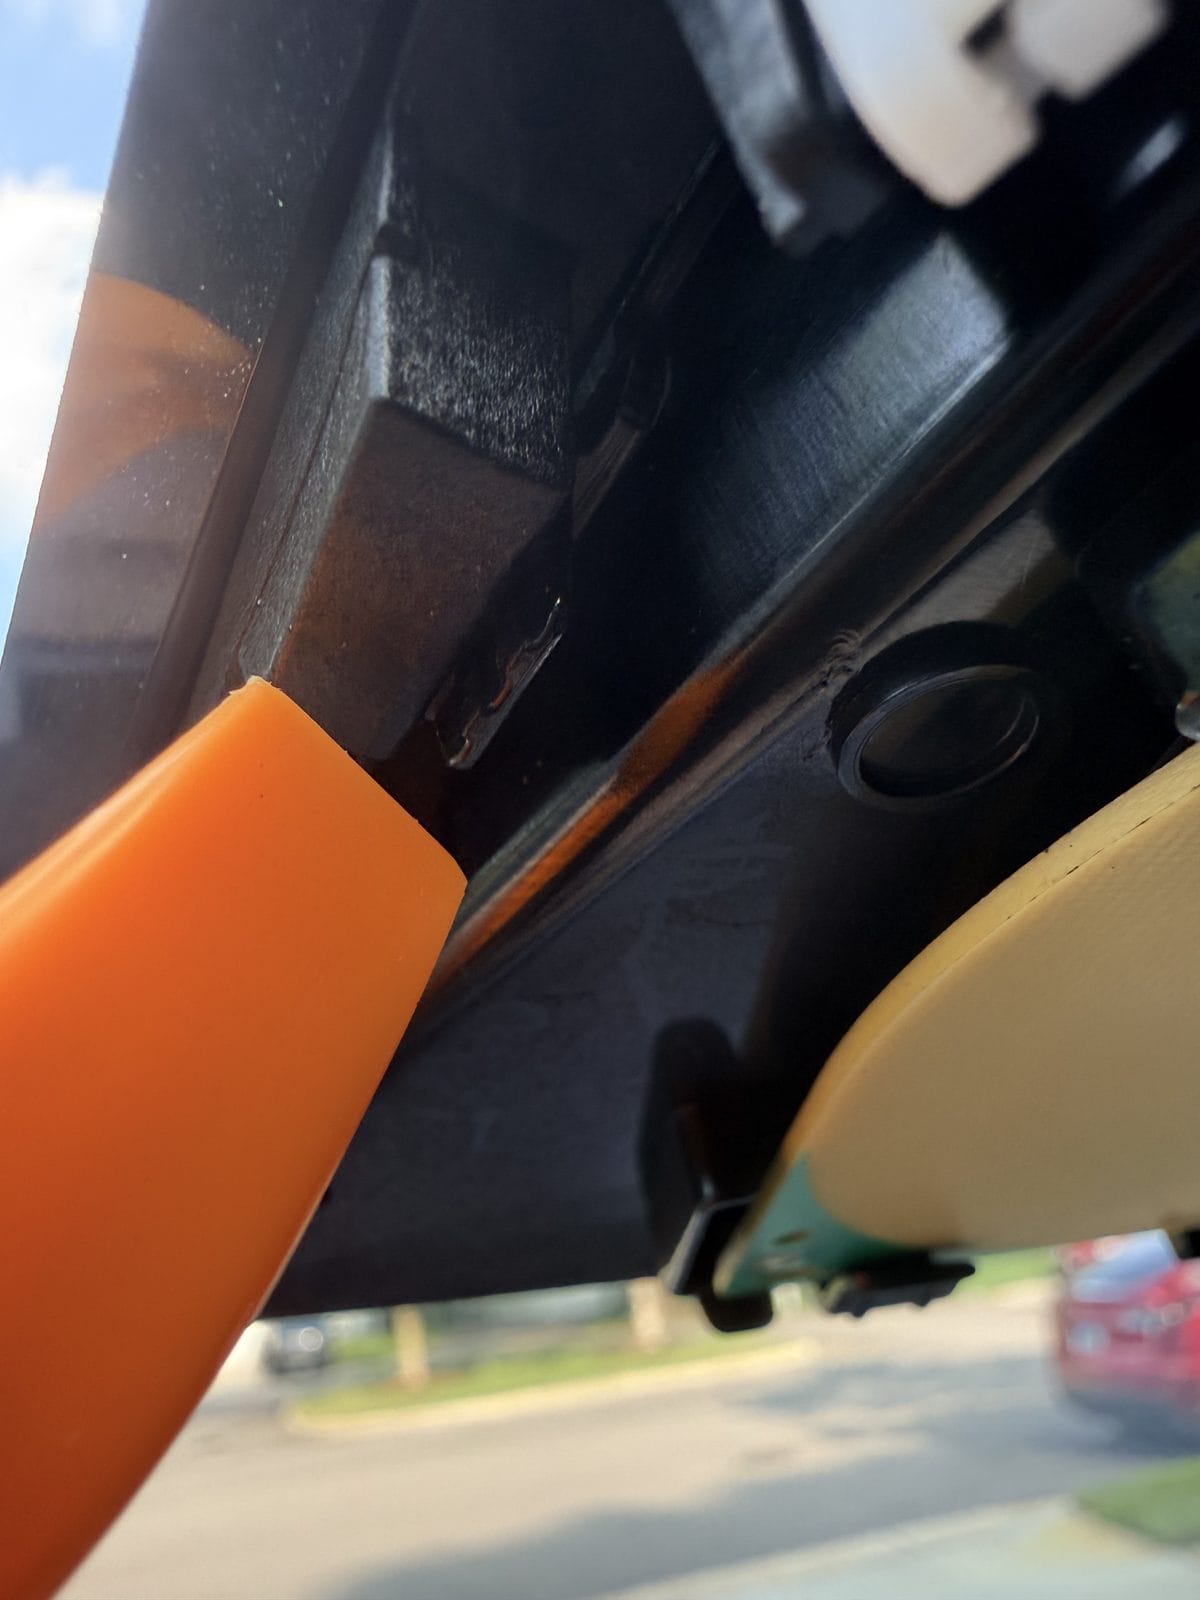
Step 5: Clean the windshield in front of the cameras
You now have open access to the section of windshield the cameras look through. Spray the cleaner onto the cloth rather than directly at the opening — there are electronics right there — then clean the glass. Always finish with a dry microfiber or glass-cleaning cloth to make sure all streaks and haze are removed. The dry pass is the part that actually fixes the problem.
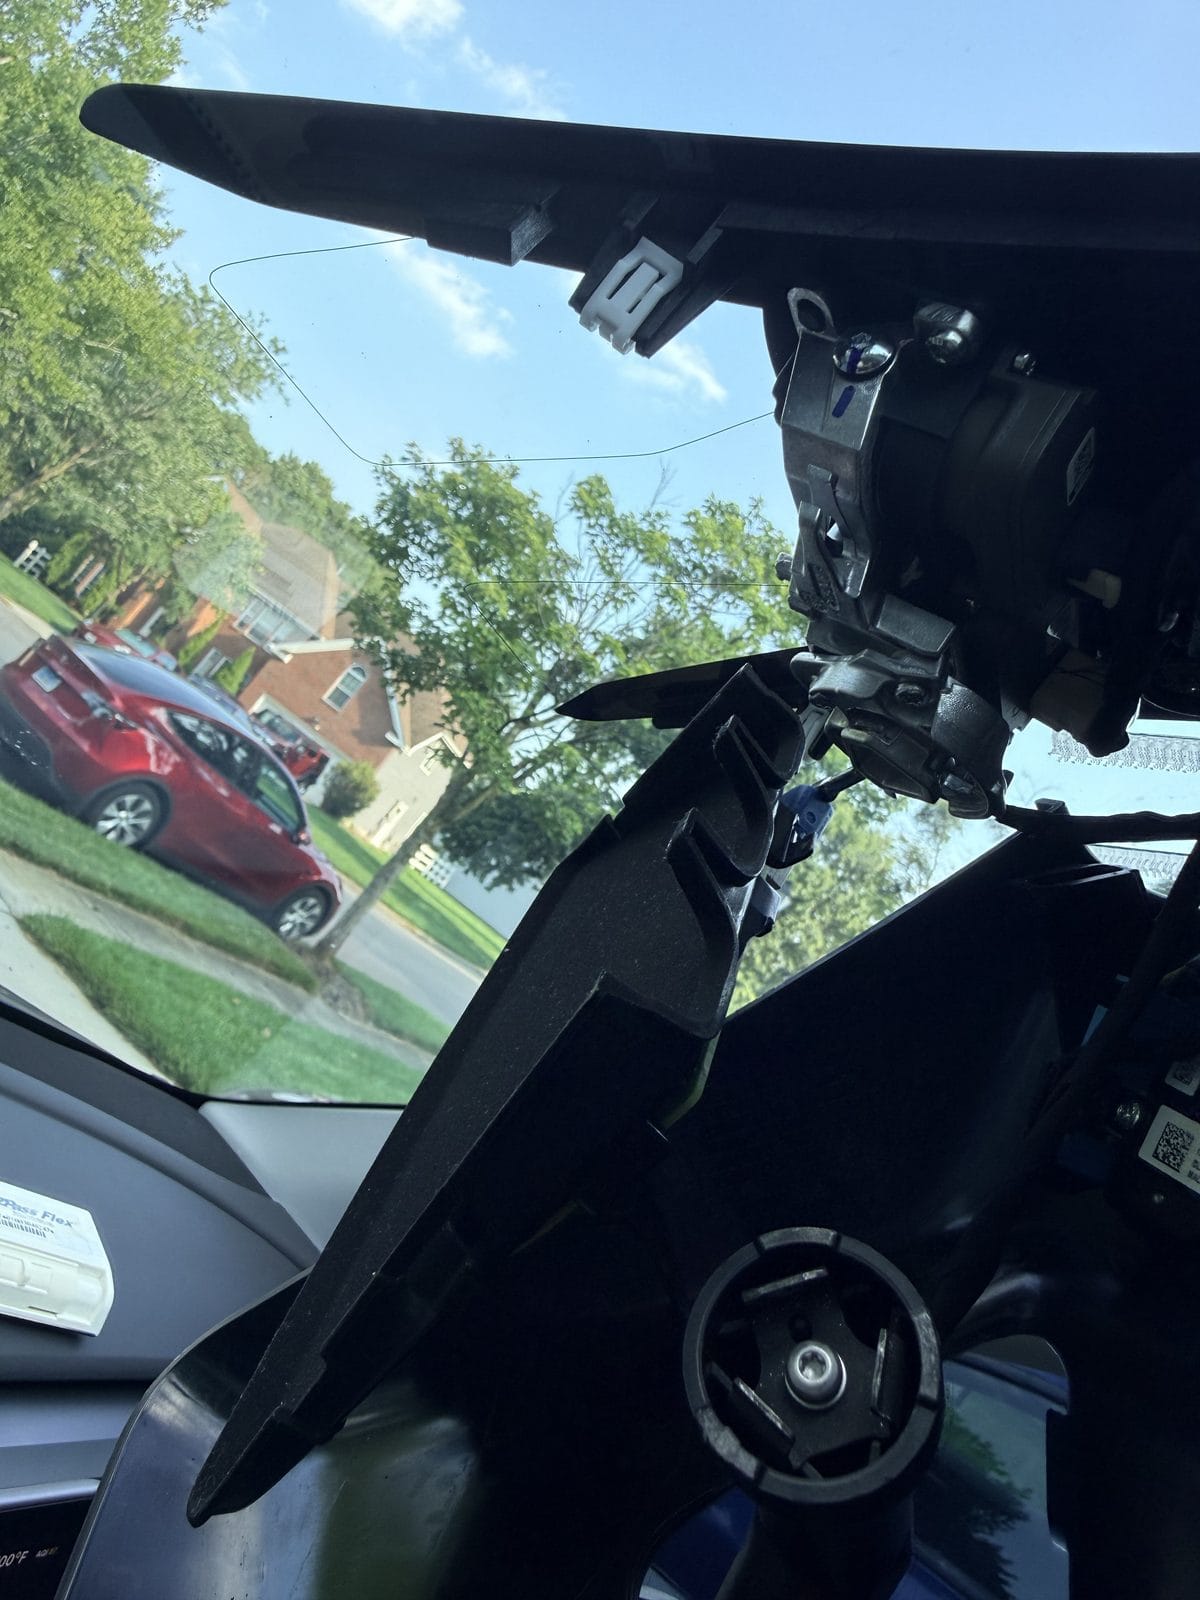
Step 6 (optional): The camera lenses
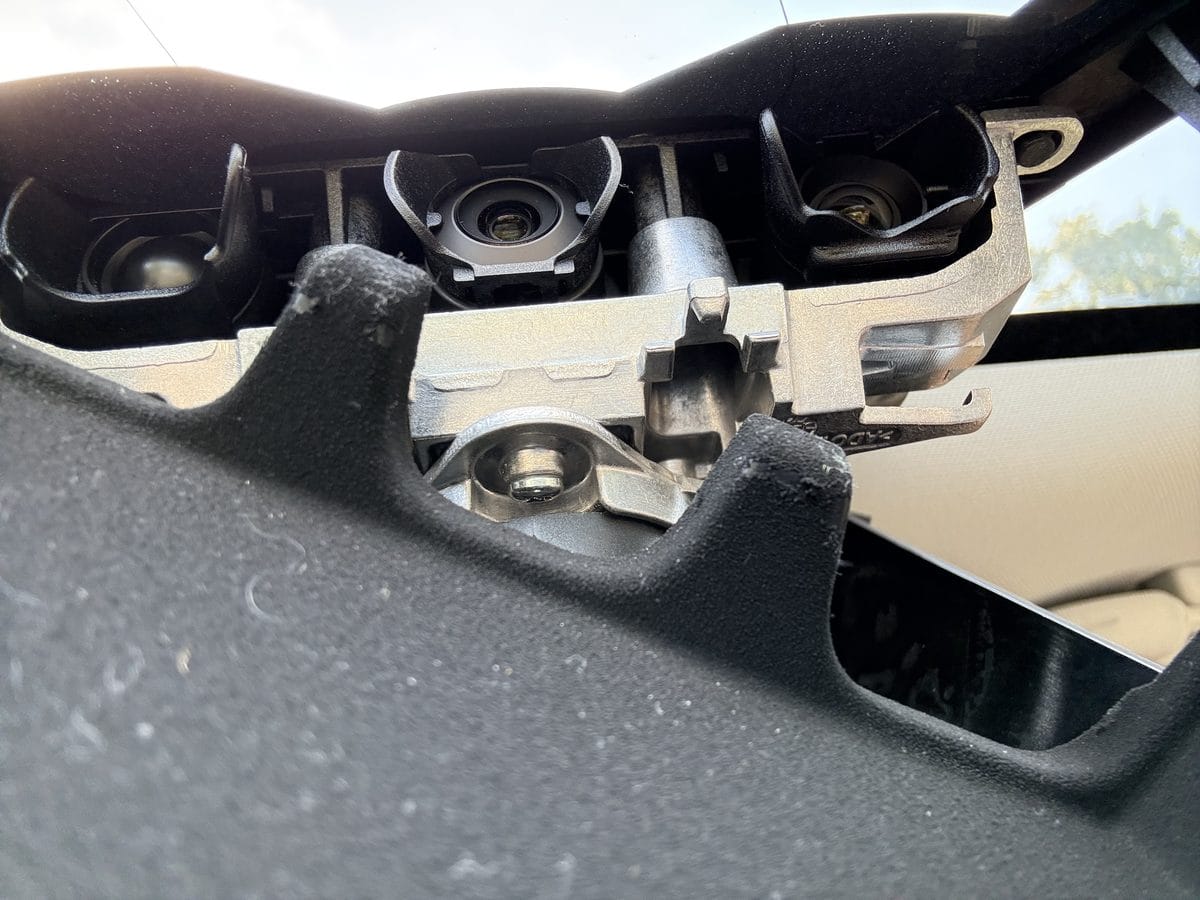
Here's what the camera cluster looks like up close from inside the windshield. The lenses are protected back here and usually don't need anything. If one looks smudged, a single gentle pass with a pre-moistened lens wipe is the right way to do it — no glass cleaner sprayed at the lenses, no dry scrubbing, no pressure on the housing.
ZEISS Pre-Moistened Lens Cleaning Wipes (80 Count)
Only needed if a lens itself has a smudge. These are individually wrapped optical wipes — safe for coated lenses, which is exactly what you don't want to hit with household glass cleaner. One box handles your cameras, sunglasses, and phone for a year.
Specs: 80 individually wrapped wipes | Ammonia-free | Safe for anti-reflective coatings
Check Price on Amazon →Step 7: Reassemble in reverse order
Put the inner camera cover back in place and secure it with its two clips. Place the larger black cover over that and press it onto its clips. Reattach the mirror (a clockwise quarter turn on my car). Then put the mirror-neck cover back on, re-hooking the retainer cord if yours has one. Done — no calibration, no error messages, no evidence you were ever in there except clear glass.
Prefer to watch the job once before pulling covers? This walkthrough shows the same housing removal and glass cleaning on a 2026 Model Y (HW4):
Mirror Removal by Tesla Model and Year
The covers and cleaning steps are similar across the lineup, but the mirror mount is not. This chart is compiled from Tesla's public service manuals — when in doubt, twist gently first, and if it resists, look for a screw.
| Vehicle | How the mirror comes off |
|---|---|
| Model 3 (2017–2023) & Model 3 Highland (2024+) | Grip the mirror stalk and twist counterclockwise (~45°) |
| Model Y (2020 – mid-2023 builds, HW3) | Single T20 Torx screw at the mount — Tesla specs a new screw at 2.5 Nm on reinstall |
| Model Y (late-2023–2024 builds, HW4) & New Model Y (2025+) | Grip the stalk and twist counterclockwise a quarter turn (this is my car) |
| Model S & Model X (2021+ refresh) | Pull the mirror's front cover straight down to release its clips, then turn the mirror clockwise until it pulls free |
| Model S & Model X (pre-2021) | Trim tool on the lower mirror cover clips, disconnect the connector, then turn the mirror assembly counterclockwise to release it from the windshield mount (per Tesla's service manual) |
| Cybertruck | The mirror “beauty cover” releases via 4 clips — note the cabin camera is attached to this cover (3 connectors), so extra care here |
Source: Tesla's public Model Y service manual and the equivalent manuals for each model at service.tesla.com — free to browse if you want the full official procedure for your exact build.
Frequently Asked Questions
How often should you clean the Tesla camera area?
Once or twice a year is plenty for the inside glass — the film builds slowly from interior off-gassing, faster in hot climates and in a car's first year or two when the plastics are newest. The outside of the windshield over the cameras gets cleaned every time you wash the car; it's the section behind the covers that gets skipped for years.
What causes the “camera blocked or blinded” warning?
Usually one of three things: dirt or water film on the outside of the glass, haze on the inside of the glass in front of the cameras, or low-sun glare the cameras simply can't see through. Glare fixes itself. If washing the outside doesn't stop recurring warnings, the inside film is the likely culprit — and this cleaning is the fix.
Can I clean the Tesla camera lenses themselves?
Yes, but gently and only if a lens actually looks smudged. Use a pre-moistened lens wipe in a single light pass. Don't spray glass cleaner at the lenses and don't rub them with a dry cloth — lens coatings matter more than a spotless look, and the lenses are well protected behind the windshield anyway.
Do the cameras need recalibration after removing the covers?
No. You're removing the covers around the cameras, not the cameras themselves — nothing about their aim changes. Just avoid pressing on the camera housing while you work. If you ever did knock a camera hard enough to matter, the car would tell you and self-calibrate over a few miles of driving.
Our Honest Verdict
This is a 15-minute job with about $30 of supplies you'll reuse everywhere else on the car. Everything is clips, with no adhesive, no calibration, and on most builds no screws. The two things that matter: check the mirror chart before you twist anything, and don't skip the dry microfiber pass, because the dry pass is what clears the haze. If you run Autopilot or FSD regularly, put this on the calendar once a year, since the forward cameras look through this one patch of glass.